
NetObjects Fusion Tutorials
How to add a form to your Website
- Quick Navigation
- Inserting a form
- Configure the form's properties
- Adding a Forms Edit Field or Multi-Line text fields
- Adding radio buttons to your form
- Adding a Drop-Down List
- Add Submit and Reset Buttons
- Test the Form
Creating a contact form
Forms provide a way for you to collect information from site visitors. Forms require a script to pass the collected data to your Web server and process it, sending it to an email address or to a text file on your Web server. Commonly used scripts include JavaScript, PHP, and Visual Basic Script.
In this tutorial you will learn how to:
- Create a form
- Set up form settings
- Test the form
With NetObjects Fusion, you can devote an entire Layout area to a complex form containing many items, or create one or more smaller forms, each in a Layout Region, table, or text box. One form might log product registrations, for example, while another emails customer comments to a product manager. You can also add a form to the Master Border so it appears on several pages.
What is a form?
Before creating a form, you need to understand a few concepts. This will make it easier to understand the various elements a form is composed of.
A form consists of three basic parts:
- <FORM>…</FORM> container tag, which is a code that instructs the browser to display objects within the container as form objects. This tag also contains a METHOD attribute that tells the browser how to send the form information to be processed. Another attribute in the <FORM> tag, called the ACTION, tells the browser where to find the correct script.
- Form objects, called INPUT TYPES, are the boxes, buttons, and pull-down lists where site visitors type text or make selections.
- Submit/Reset buttons activate the processing instructions found within the <FORM> tag. A Reset button clears information from the form objects if site visitors decide not to submit the form or to erase the contents of the form and begin again.
Inserting a form
In Page view, select the Form Area tool from either the Form toolbar
![]()
or the Standard toolbar, and draw a rectangle in the Layout area or Master Border.

The Layout may also be used as a form.
- Click in the Layout area.
- On the Layout Properties panel, select Layout is a form.
In case that you select the Form Area to insert a form, the Create Form dialog appears. Select a type of form container:
- Create position-based form (Layout Region) creates a form in a Layout Region that you can resize and drag anywhere on the page. When you add form objects, text boxes, and other objects to the Layout Region, you can freely position and align them, just as you position objects in a Layout area.
- Create text-based form (Text box) creates a form in a text box. Text you type and form objects you add appear sequentially, just as when you type. This is a good choice for forms that have a lot of text, where objects appear sequentially, or that have a simple layout, like a row of checkboxes or a single column of fields. A text box form typically generates less HTML when you publish than a Layout Region form.
- Create form in a Table creates a table where you can line up form objects by inserting them in table cells. Each cell acts like a text box, where you type and add objects just as you add other objects to a table. You can only have one table for the entire form.
- If you define a Layout, Layout Region, or text box as a form, you can insert multiple tables to help align form objects.
- Define Layout as a form (limits page to one form) creates a single form on the page that occupies the entire Layout area.
Now that we have defined a place for the form, let's add the elements that are common to a form. We assume that we want to create a form for collecting personal data to send newsletters to customers.
Configure the form's properties
In order to have a fully functional form, you have to properly set up the form.
- Click on the Form Label to view the Form Properties Panel
- In the Action field click on the arrow drop down and choose [Form Handler (PHP)]
- Add your information in the fields.
Note: If you do not want the form to write to a CSV file or a user-uploading file, you can leave the CSV File Path and File Upload Folder fields blank. (Make sure you delete the text populated in the field.)
- SMTP: 127.0.0.1
- From: info@mywebsite.com
- To: info@mywebsite.com
- Subject: enquiry form
- Success URL: ../html/thankyou.html
- CSV File Path: ../db/mail.csv
- File Upload Folder: ../db/upload/
SMTP: This setting can be the default [127.0.01] or [localhost]. Check with your host provider on the best configuration.
From: The email address you want the from field to be populated with.
To: This is where you want the email sent to after the end user has submitted the form.
Subject: Can be whatever you want the Subject field to be.
Success URL: This is where the form will go after the end-user has submitted the field.
NetObjects Tip: If you put the path "../html/thankyou.html", make sure you create a page in Fusion called "thankyou".
CSV File Path: This can be left blank, make sure you delete the default text. You can also designate where you want the email to be copied to a CSV file.
File Upload Folder: This can also be left blank. If you want the user to attach a file, add a File Selector Field to the form.
Note on the File Path config
If you use the above example, you must create a directory on the server called "db" and in the "db" directory create a subdirectory called "upload."
This can be done in the Publish View.
- In the Publish View, connect to your host account.
- Right Click in the Remote window (right panel) and add a "new folder" name to this folder "file"
- In "file" folder, create an "upload" folder
Setting permissions.
Right click on the folder and assign the folder with "write permissions."
Adding a Forms Edit Field or Multi-Line text fields
A single-line text field can accommodate just a few words, such as a name or phone number.
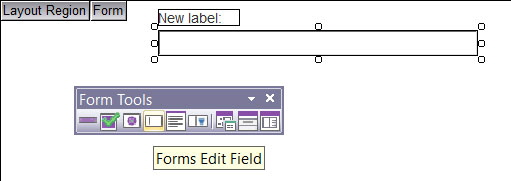
- In Page view, select the Forms Edit Field tool from the Form toolbar.
- Draw a rectangle on the form.
NetObjects Tip: When a Forms Field is added to the Form, a label is automatically included.
The Forms Edit Field Properties panel appears.
- Set the Forms Edit Field properties.
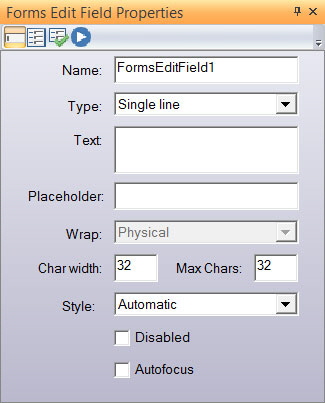
Set the following values on the Forms Edit Field Properties panel:
- Name: name
The PHP script that processes the form uses this variable name and associates it with the actual data supplied by the site visitor.
NetObjects Tip: be sure to leave no spaces between the words (e.g. FirstName – correct; First name – incorrect)
- Type: Select the type of field from the drop-down list.
- Text: Leave blank.
The text field provides instructions to the site visitor. Text you enter here— Please enter your name, for example, appears in the single-line text field when the visitor views the form and must be deleted before actual data can be entered.
- Wrap: Select a text wrap setting to control how the visitor's input will be displayed when the visitor enters more information than can be displayed in the defined text field. This option only applies to multiple-line text fields.
- Char width: Enter a number to define the width of the file selector text box by specifying the number of characters visible in the field.
- Max chars: Enter a number to define how many characters site visitors can enter in the field. When typing exceeds the field's visible width, text scrolls up to this number of characters.
- Style: Select a style to apply formatting to the contents of the selected box.
- Autofocus: Sets focus on the field when a page is loaded.
Now its time to edit the label for that field.
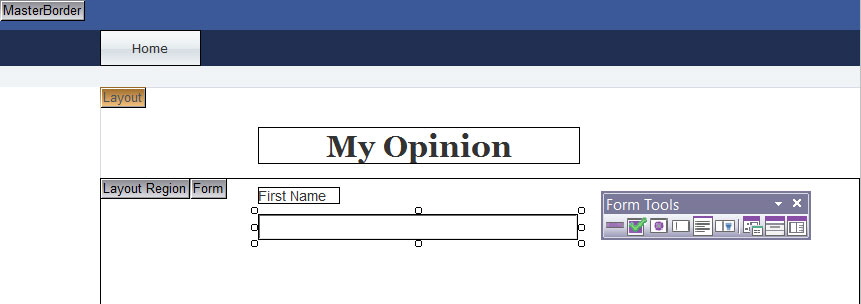
- Type or paste label text in the label text box.
- Use the options on the Format tab of the Forms Field Label Properties panel to format the label text.
- Click the Text Box tab on the Forms Field Label Properties panel to format the background and style properties for the form label.
- Click the Form Label Inspector tab.
- Edit the name of the form label in the Name text field.
- Choose the form object that corresponds to the label in the drop-down menu.
- Insert two more single line fields for Last Name and email address.
NetObjects Tip: There is an HTML5 form option for email, use the Type field to select it from the list.
Adding radio buttons to your form
Use radio buttons when you want site visitors to select one item, such as a Yes or No. When you create a group of radio buttons, give the same name to all the buttons. Using the same name for all radio buttons in the group helps the script determine which radio button was selected from the group.
- In Page view, select the Radio Button tool from the Form toolbar.
![]()
- Draw a rectangle on the form.
Set the Forms Radio Button properties.
- Group name. Type the name for this group of buttons that’s passed to the script processing the form. This should be the same for all buttons in the group.
- Value sent. Type the value passed for the button if the site visitor selects it.
- Default. Choose either Selected or Not Selected to set the button's initial state, which is returned as the response if the site visitor doesn't change it. Remember that only one radio button in a group can be selected at a time and this only works if all buttons in the group have the same group name.
- Style. Select a style to apply formatting to the contents of the selected box.
Add a label for the radio button.
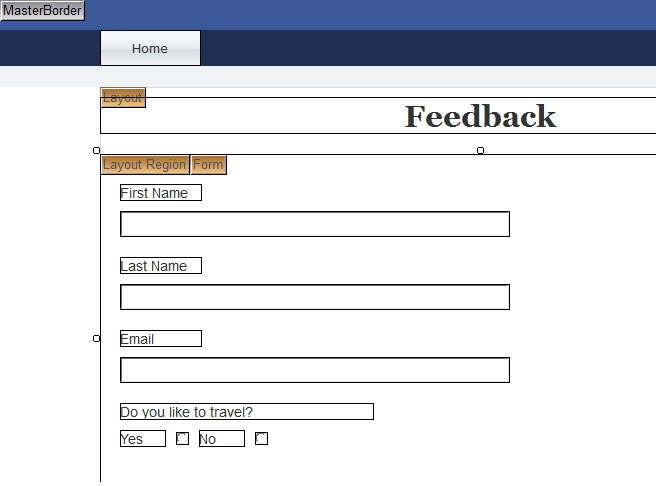
Place two text boxes near each radio button as shown below:
Adding a Drop-Down List
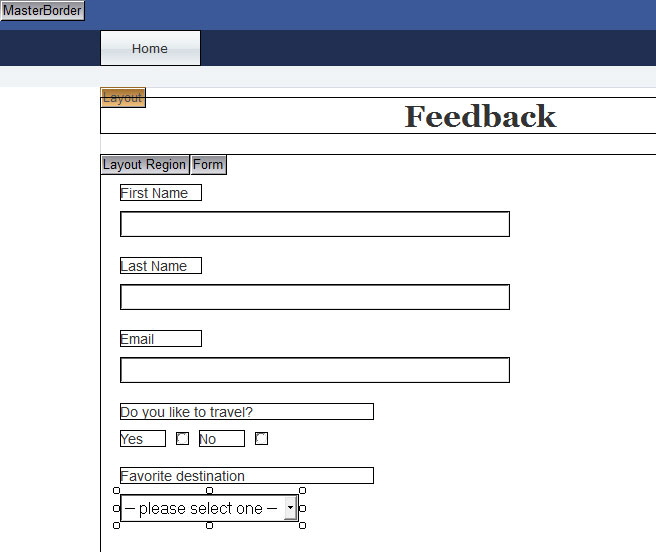
Like radio buttons, a drop-down list forces site visitors to select a single item. You create this object using the Forms Combo Box tool.
- Select the Forms Combo Box tool.
- Draw a rectangle on the position where you want to place the list.
- On the Forms Combobox Properties panel, type destination as the name of the object.
- Select Dropdown list as the Type.
Under Elements, click the Plus (+) button.
In the Enter Value dialog, you enter the name and value of each list item. The name is the text string that appears in the drop-down list as an option. The value is the text string sent to the server if the site visitor selects this option. The Selected by default option controls which item in the list is initially visible to site visitors.
Use these settings to create the drop-down list (name; value; selected by default):
- -- please select one --, <blank>, Yes
- Hawaii, No
- Bahamas, No
The width of the drop-down list box adjusts to the width of the widest item in the list. You can use the up and down arrow buttons on the Properties panel to change the order of items in the list. The items appear in the order shown on the Properties panel.
Add Submit and Reset Buttons
You use a Submit button to transfer the data that site visitors enter into a form. A Reset button clears a form so site visitors can easily start over.
- Click the Forms Button tool on the Form toolbar.
- Add the Forms Button.
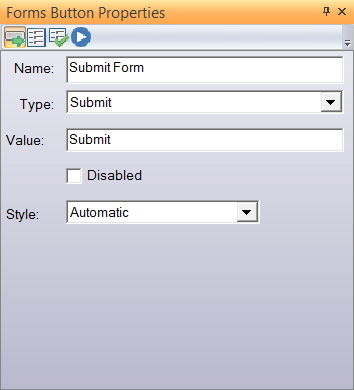
- Enter the following values:
- Name: Submit Form
- Type: Submit
- Value: Submit
- Click the Forms Button tool on the Form toolbar.
- Add another Forms Button.
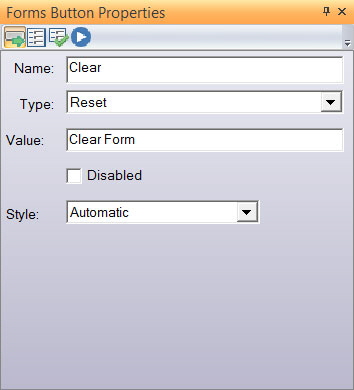
- Enter the following values:
- Name: Clear
- Type: Reset
- Value: Clear Form
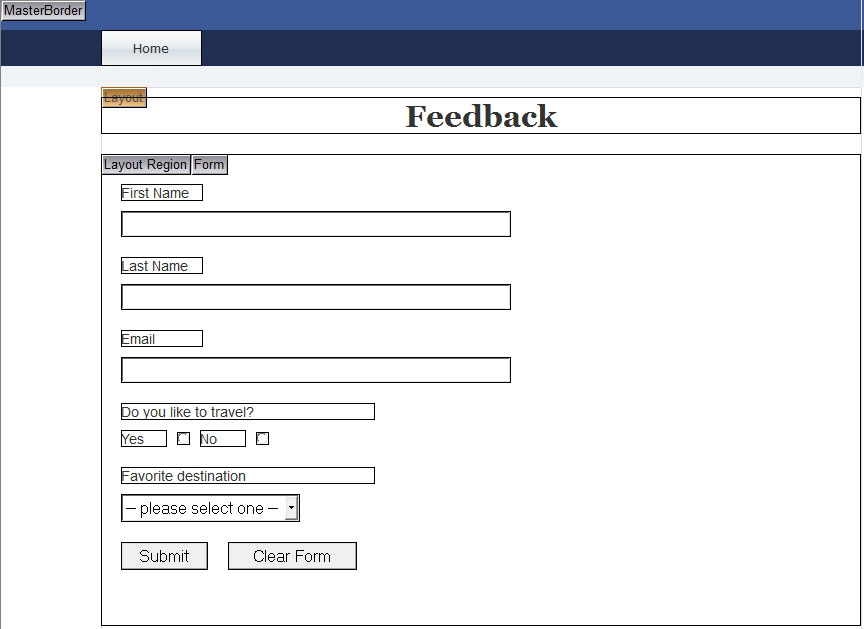
Finally, the form should look like the example below.
- Publish the site remotely.
- Enter the data on the form page.
- Click the Submit Form button to submit the form.
- Click the Clear Form button to clear the page.
- If you have access to your email, check the email that is delivered.